
Flexy Component Rack
 As I started to collect more and more home theater components it quickly became apparent that I was going to need a place to put it all. When I just had a few items I just had everything on the floor underneath my screen. This obviously wasn’t the ideal place for it; placing equipment on carpet is not a good idea because the equipment cannot cool properly, it was a little unsightly and the lights from the equipment was distracting my eyes from the screen. When I finally decided it was time to get myself a component rack I started researching them on the net. I quickly found that a good sized one of good quality is not cheap; prices above $400 was common. When I saw this I decided to see if there were any good DIY alternatives. It was then that I found out about the Flexy Rack.
The flexy rack is a great alternative to a lot of the higher priced commercially available units. The Flexy is easy to build, very versatile, relatively inexpensive, you can build it exactly how you want it, have as many shelves as you need, each shelf is isolated from the others eliminating vibrations, easily adjustable and it looks great. I built a double wide Flexy; it sits two components side by side with five shelves total, so I can fit 10 components on it. I used 3/4″ rods as well as 3/4 inch thick MDF for the shelves. I also, if the need arises, have room to add another shelf.
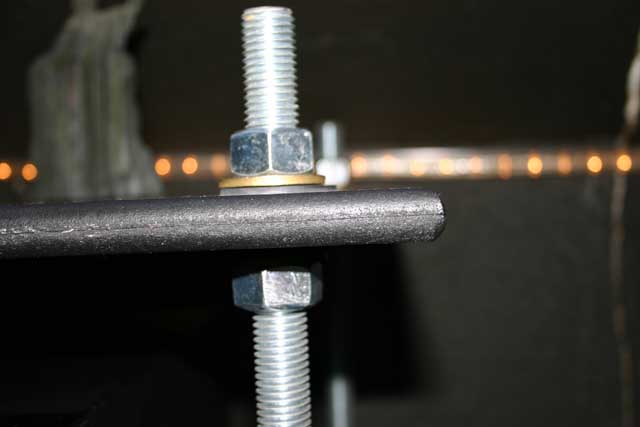 To build your own flexy I suggest you check out TNT-Audio for directions. As far as I know they are the originators of the idea. To get the needed supplies I bought all pieces, minus the wood, from McMaster-Carr they had great prices, very reasonable shipping and all the necessary parts. I bought the wood locally at Home Depot. Construction is very easy and can be done in just a couple hours.
I have been very happy with my flexy, it really makes for a great component rack. It can grow with me, if I ever change one of my components I can easily adjust the shelves to fit, I think it looks nice and it was very affordable.
Filed Under Equipment | 2 Questions/Comments |
Comments & Questions
If you would like to make a comment, or ask me a question, please fill out the form below.
If you want a personalized image to appear with your comment you need a Gravatar.
Sign up for a Gravatar today. It's free and easy
February 5, 2013 10:17 am
I looks great. Thanks for documenting it and posting it only. I have a couple of questions:
Do you have casters on it for rolling it out to access the back?
Where did you get your threaded rods from? My Home Depot only carries 36″ and I need 60″ rods.
Is there anything you would do differently if you had to do it again?
February 6, 2013 4:05 pm
Mike,
Thanks for the feedback. I do have casters on it and I highly suggest them. Makes moving it around a lot easier. As I stated in the article, I got all the parts (minus the wood) from McMaster-Carr. Off the top of my head there isn’t much of anything that I think I would do differently if I were to build another one. I may possibly use pipe flanges on the bottom shelf rather than drilling through it.