
J-SPEC Miata Storage Tray
Rating: 

 Pros: A little extra storage space which every Miata owner could use. Looks completely stock.
Cons: Finding a place to put the air bag switch. Fit is a little loose.
The J-spec storage tray adds a little more storage room to the Miata by replacing the airbag switch with a little cubby hole. The unit isn’t very big; but it’s great for spare change, a pack of smokes, a garage door opener or any other small items. One thing that is really nice about it is that it angles down so items will not slide out under acceleration. I bought the tray from Corksport; it is fairly inexpensive at only twelve dollars plus shipping. With a price like that it’s hard not to add the Miata accessory to your car.
Installation is pretty easy, especially if you have ever removed the center console in your Miata. The hardest part is finding a place to put the switch. Although after a year and a half of owning my car I had never turned off my passenger side airbag I still wanted to keep the switch available just in case I ever gave a ride to a small person or a pregnant woman. I ended up putting the switch behind the glove compartment (more details about the placement in the install instructions below).
OK let’s get started with the install.
First you need to remove your center console; this is easy if you know where all the screws are. There are five screws in total. Two in the storage compartment/armrest, two towards the front on the sides, and the one hidden under the power window switch. You will also need to remove your shift knob. The two under the armrest are easy enough, just remove whatever junk you have in there and unscrew the two screws. You will also need to remove the rubber gasket around the gas and trunk release switches. The two on the sides are easy as well, just flip the plastic cover that is over them up and unscrew. The screw under the power window switch is the one that always stumps people when they are trying to remove the center console only because they don’t know it’s there. Just gently (so you don’t mar the plastic) pry out the switch and unplug it and you will expose the lone screw beneath. Once you have all those screws and your shift knob out remove the center console. With the console removed you have the above picture.
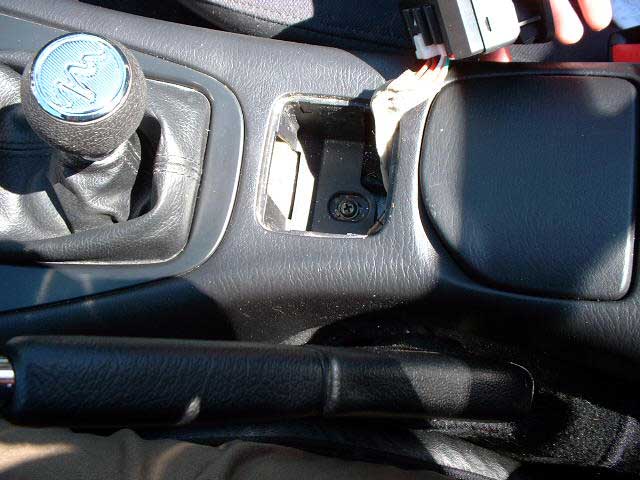
 With the console removed you now have to remove the radio surround which houses the switch. There are two screws just below the switch and a bunch of clips holding it in place. Just remove the screws and pull on the plate to release the clips. When the surround is loose, unplug the switch and the lighter and remove the radio surround. You will now have the picture on the left.
Now you have to remove the switch from the radio surround. There are a couple clips holding it in place. Then all you have to do is slide the storage tray in and it will click into place. My tray doesn’t fit all that tightly, I can easily remove it by just pulling on it. This is great for cleaning it out but not so great because it will sometimes pop out when I am taking an item out of it.
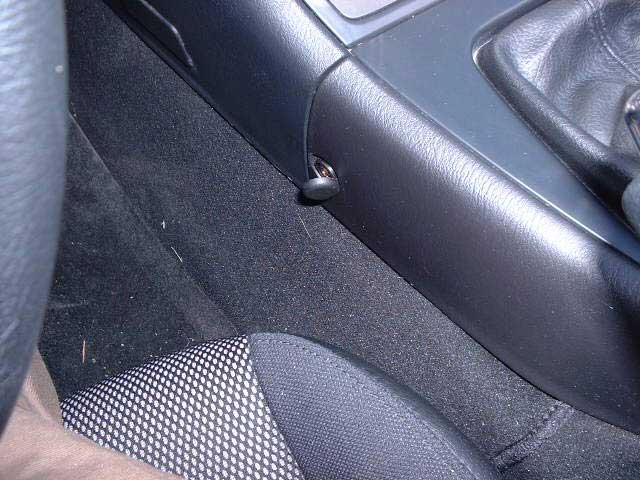
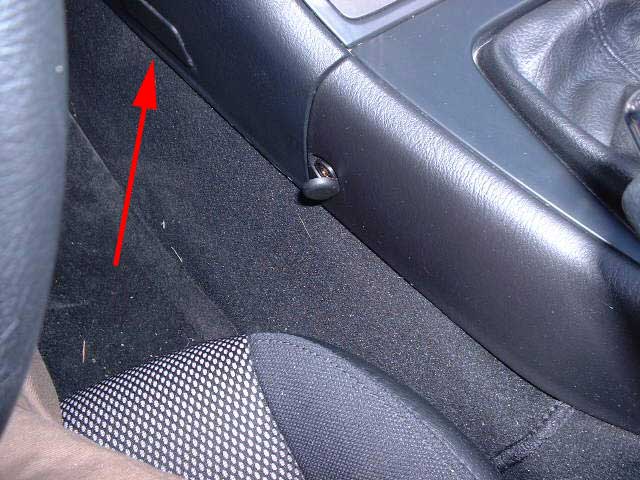
 With the airbag switch removed you now have to find a new home for it (if you want to keep it useable). This is the hardest part of the install. The wiring for the switch is bundled up with the lighter wiring so first you need to free up some slack so you can move it. Just cut away the tape bundling the wire up. I originally wanted to place the switch behind the blank on the driver’s side of the console, but I quickly found out that there is not enough room behind it. I then looked all over the place in the driver’s side footwell; there were a couple of places that I could have physically placed it, but none of them allowed easy access to turn the switch on and off. I then looked on the passenger side. I found a good place for it behind the glove box. You can see the location in the picture on the right. I know it’s kind of difficult to tell where it is in that picture but once you get under there you will be able to tell where it is. I just attached the switch there with some double sided tape.
 That’s it, the installation is done. Now you just have to put everything back together in the reverse order you took them out. Just make sure you plug your lighter and power window switch back in.
Overall I am very pleased with this Miata accessory. It’s not a really big thing but it is nice to have the extra storage and since it is a Japanese Mazda stock piece it looks completely stock.
If you have any questions or comments about this page, please let me know by filling in the form down below.
Filed Under Interior | 3 Questions/Comments |
Comments & Questions
If you would like to make a comment, or ask me a question, please fill out the form below.
If you want a personalized image to appear with your comment you need a Gravatar.
Sign up for a Gravatar today. It's free and easy
3 Questions/Comments/Trackbacks so far

April 23, 2013 8:42 pm
Thanks for a great writeup.
Hope you don’t mind, I linked to it in a thread I posted over on Miata.net:
http://forum.miata.net/vb/showthread.php?t=498269
Thanks again…
Frank ‘RazzCat’
September 22, 2020 8:40 pm
so, I think i know where you put the switch but i am not 100% sure. that bracket looks like it is near where the glovebox goes in, without standing on my head i can’t tell which side of the glove box that is.
PS you and razzcat inspired me to do whatever it took to find one of these cubbies. so i 3d scanned the switch and made one of my own. https://forum.miata.net/vb/showthread.php?p=9959538
September 24, 2020 8:17 am
You do kind of have to stand on your head to access it. It’s not the most convenient locations, but I think I’ve had to turn it off maybe 5 times since I installed it. Other than the picture, I don’t really know how to explain where it is, I can say that it’s behind the glove box and closer to the drivers side of the car.
Very, very cool about the 3D printing of the part, looks great!