Racing Beat 4-2-1 Miata Header
Rating: 


Pros: Gives the Miata a nice power poost, this is hands down the best power mod I have done, looks great under the hood.
Cons: Absolutely none.
I bought my header from Racing Beat during a group buy so I saved a few bucks on the purchase price, but I would happily pay the full price for this beauty. I also have to give kudos to Racing Beat, there was problem with my order originally and Racing Beat was very apologetic, quick to correct the error and paid all the shipping costs, they are an asset to the Miata community. This was by far the best modification that I have done to the car. The power increase is very noticeable throughout the rev range, and as an added bonus it mellowed out the sound of my exhaust.
Here are my installation instructions, I hope you find them useful.
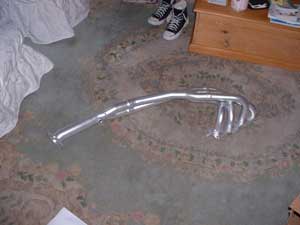 Here is the Racing Beat Header out of the car, so you can take a look at what you have to stuff under your Miata’s hood. The piece is a real beauty, and the construction is first rate.
Before I get started on the install process I have to say that the instructions that Racing Beat send with the header are very good and I am assuming that you are using them in conjunction with mine.
I also want to thank Joe Doolitte, Mark Anderson and Chris Anderson for helping with the install. And a very big thank you to Crazy Dave the Crazy Red Italian for helping and letting us use his shop for our installs. If you need some quality Miata accessories, stop by Dave’s web site.
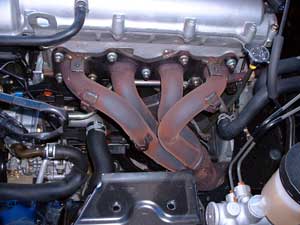 OK, on with the install. First things first, loosen the lug nuts on your drivers side front wheel, then jack the front end of your Miata up and place it on jackstands. Once the car is up you can go ahead and remove the wheel just to get it out of the way for later (some people have done this install with the tire on).
The first thing you have to do is remove the factory strut tower brace if your car is equipped with one. This is easily done. There are four bolts, two on each end of the brace. Next you need to remove the heatshield. This is easily accomplished by removing the nine 10mm bolts securing it to the car. The heat shield will not be reused. You need to remove your air box as well. I had already installed the Monsterflow with the cold air box, but removing it is simple enough. You just need to remove the box itself; you do not need to remove the crossover tube. When your done with that, your car should look like the picture above.
Note: If your Miata is equipped with ABS, you will need to move your windshield washer tank out of the way but keep the lines connected. (My Miata does not have ABS so this didn’t apply to me.)
Now would also be a good time to disconnect the EGR fitting. This is a pain in the ass only because you don’t have much room to work. I found that a 21mm or 22mm wrench worked best (can’t remember which), once you break it free you can spin it by hand. I found that I did not have to remove the tube retaining bolt that is at the back of the engine which the instructions speak of.
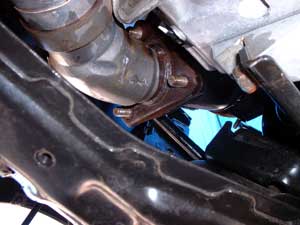 Now would be a good time to unhook the oxygen sensor. I left the sensor attached to the header and just unplugged it. You will remove the sensor once the piece is off the car.
Now comes the more difficult part. You need to separate the exhaust manifold from the front pipe. The picture to the left shows the connection. This is why you remove your drivers side front wheel, although probably not completely necessary it makes the job easier. The bolts are a pain to get to (thanks Mazda), the top one especially. I used multiple extensions for the top bolt in order to get a clear shot at it. With a little work you will get them all off.
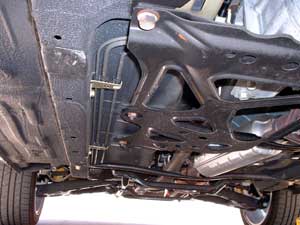
Now you have to remove the bracing underneath the car. The picture on the right shows one half off the big brace; you can see three of the bolts in the pic. The other three are on the same place on the opposite side. The other brace is located closer to the front of the car under the transmission, there are four 17mm bolts on this brace. All of the bolts for the bracing are 17mm.
Unfortunately I don’t have a pic for this next step. You need to unbolt the bell housing bracket that supports the stock manifold. This bracket is not reused. These bolts were on here extremely tight and are in a hard to reach place (thanks again Mazda). Luckily for my install I had access to air tools (Thanks to Dave the Crazy Red Italian).
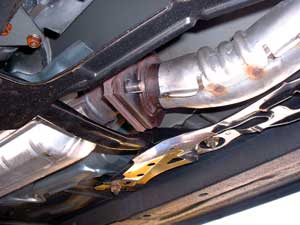 Now is a good time to disconnect the front pipe from the connecting pipe; this is easily done. There are only two bolts; and if you removed the cross member bracing by this step (unlike me), they are readily accessible. The pic on the left shows this connection.
Now you have to pull out all the old stuff from your Miata. The only thing that you have to watch out for is the water heater tube which is somewhat hidden by the exhaust manifold. It is secured to the header by a small bracket over one of the lower mounting studs. You can see the location in the picture below (the red arrow). When you are removing the manifold let this bracket fall away and make sure you do not pull it rearwards or it will pull out of its housing. You remove the exhaust manifold from the top of the car and the front pipe from underneath the car.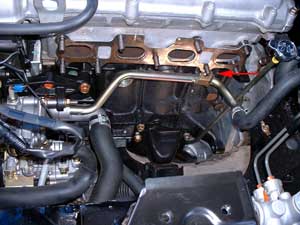
Now you have to pull off the oxygen sensor from the old pipe and install it on the new header. This is really easy–the only thing to watch out for is not to mess up the sensor. With a little care this is easily accomplished. Do not plug in the electrical connection for the oxygen sensor at this time, just screw it into the header.
You are all set to place the header into your Miata. I highly suggest having help here. We accomplished the task with one person under the car, one person handling the header and another person pulling the engine to the passenger side. With lots of rocking, twisting, turning, cussing and screaming the header will get onto the studs. Make sure that the water heater hose bracket is on top of the header being careful not to pull the heater hose rearward. Before you start bolting everything down tight, reinstall the EGR tube; this is a pain but with some wiggling around you can get it back on. Then start bolting everything up; the bolts on the header should be torqued down to 29-33 ft/lbs.
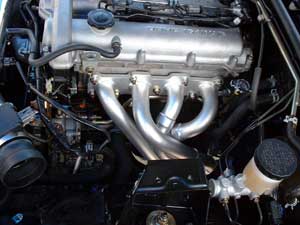 When securing the header to connecting pipe, don’t forget the gasket that Racing Beat supplies. I found the best way to get the gasket in there was to get the bolts lined up and to slide the gasket between them. Using a screwdriver you can work the gasket up into a recess on the header and then you can just pinch it in there as you tighten down the bolts. These bolts should be tightened to 24-34 ft/lbs.
Here is a picture of the installed header, looks great doesn’t it?
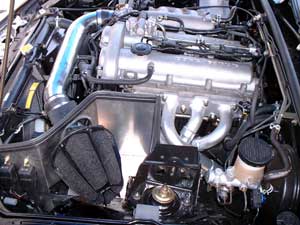
Now you just have to put everything back together. Reinstall the chassis braces, plug in your oxygen sensor, reinstall your intake assembly and, if you have ABS, your windshield washer tank. Here is another picture of the header with everything back together.
Then take your Miata for a spin and enjoy the new power. This is really a great improvement for the Miata, I highly recommend it!
If you have any questions or would like to give me some tips that you have for installing this piece that I can add to this page, feel free to leave a comment below.
Filed Under Power | 1 Question/Comment |
Comments & Questions
If you would like to make a comment, or ask me a question, please fill out the form below.
If you want a personalized image to appear with your comment you need a Gravatar.
Sign up for a Gravatar today. It's free and easy
1 Question/Comment/Trackback so far


August 25, 2011 4:24 pm
I have a cali set up with two o2 sensors but there is no place to put my 2nd lower o2 sensor in the cali emitions system. i live in ks dont need it. what do i do with the second o2 sensor for cat? 99 mazda miata 1.8 ty