Plastic Text Photoshop Tutorial
Creating plastic text is actually quite easy and makes for a great effect. The end result is one of the finest effects for text in my opinion and the ideas presented in this tutorial can be used on all sorts of thing like buttons and interfaces. Lets get started. For this effect to work best it is best to work large so create a new document around 900 X 900 pixels with a white background. Choose a nice font, in this tutorial I am using Monotype Corsiva and choose a nice blue color, I am using RGB 14,98,175. Make sure your letter fills up the majority of your canvas. Remember, bigger is better while creating the effect, you can shrink the letter down when we are done. If you have followed the instructions your canvas should now look like this.

Now select the text layers transparency by pressing and holding down the ctrl button and clicking the layers icon. Now create a new layer, name this layer white, and contract the selection (Select/Modify/Contract) by 15 pixels.

Now choose the white color in your color picker and fill the selection with white. Make sure you are working on the new layer you created and named white in the last step and not on the text layer. Now remove the selection (Ctrl+D) and now we need to blur the white color. Use gaussian blur (Filter/Blur/Gaussian Blur) once at 16 pixels, then again at 8 and then one more at 4. Your image should now look like this.

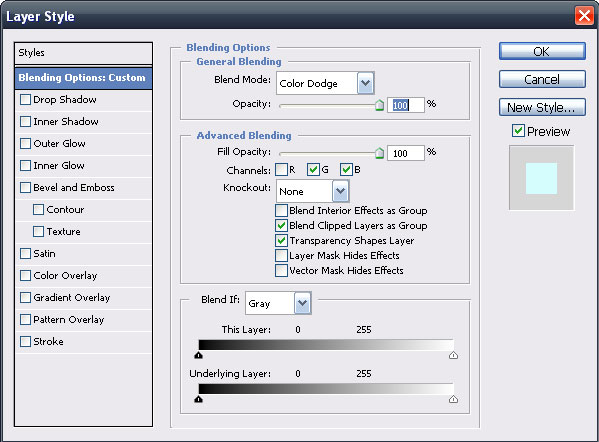
Now the next step will depend on what version of Photoshop you are using. If you are using Photoshop 6 or higher change the layers blending mode to Color Dodge. Once color dodge is selected double click the layer to open the Layer Style menu and deselect the Red Channel under advanced blending (click here for a visual aid)
If you are using an older version of Photoshop, 5.5 or lower, set the layers opacity to 50% and change the blending mode to Color Dodge.
Now your image should look something like this.

Now we need to add some highlights. To do this we are going to use the Lighting Effect but first we need to get the image ready. Choose the letters transparency again by pressing and holding down the ctrl button and clicking layer with your letter in it. With the letter layers transparency selected go to your channels window and create a new channel from the active selection by pressing the “Save Selection as channel” button. This will create a new channel. Select this new channel and with the selection still active do a series of Gaussian blurs. Do the first guassian blur at 16, then one at 8, then 4 and finally 2. Then invert your selection (Select/Inverse) and press delete. Now remove your selection (ctrl+D). Your new channel should now look like this.

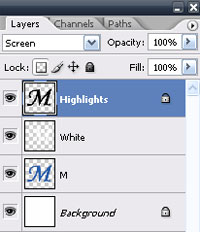
Go back to your layers window and once again choose the letter layers transparency. Now create a new layer and drag this layer up above the layer you named White. Name this new layer Highlights. Working in the newly created Highlights layer, fill the selection with black, set the layers blending mode to screen and make sure that you select preserve transparency. Your layers window should now look like this.
Still working with the Highlights layer lets break out the Lighting Effects filter (Filter/Render/Lighting Effect). To see the settings I used for the lighting effects filter click here. Things to make sure you do and watch for with the lighting filter because you may need to fiddle with the settings to make it look right. Make sure that you change the texture channel to Alpha 1 which is the channel that you made earlier. Make sure you are using a directional light using a value of around 32, you want to make sure the entire letter is lit but you really want the edges to be highlighted.
Once you are done with the lighting effects filter give the layer a slight guassian blur to smooth it out, a value of 2 to 4 should be good enough, I used 4. Your image should now look like this.

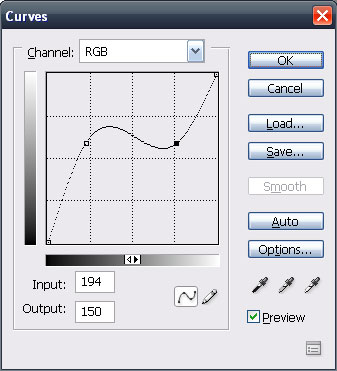
We are just about done now, looking pretty good huh? Now for this last step you can play a bit and fiddle until you like the end result the best. We are going use the Curve tool (Image/Adjust/Curves). Just play around with the curve until you get a look that you like. If you would like to see what my curve looks like click here. Your end result should now look something like this.

We are pretty much done now. You can spice it up by adding a drop shadow though. Make a drop shadow by going to Layer/Layer Style/Drop Shadow. Changing the color of the drop shadow to a blue tone so that it gives the effect of light passing through the plastic. You can see my end result to the right. If you want to see a bigger version, which really looks a lot better, click here.

Any questions, comments or feedback please fill out the form below.
Filed Under Tutorials | Questions & Comments |
Comments & Questions
If you would like to make a comment, or ask me a question, please fill out the form below.
If you want a personalized image to appear with your comment you need a Gravatar.
Sign up for a Gravatar today. It's free and easy