Frozen Text Photoshop Tutorial
The first thing that you need to do in order to make some frozen text in Photoshop is to put some black letters on a white background. I used 80pt Cooper black in my example. Once you have your text situated how you want it, rasterize the text layer. And then flatten the image.

All right, using the magic wand tool select the white background (you do not have to worry about selecting the inside of letters, such as the middle of an O). Apply the Crystallize filter using a value of 10. Your text should have a jagged look now.

OK, now do a select inverse so that your text is selected. Under your filters menu find the noise filter and add noise with a value of 70 with the distribution set to Gaussian

With the text still selected run a slight Gaussian blur over it. Use a value of 2 or so.

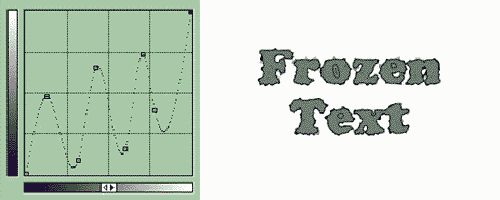
This next step can be a little tricky. You need to adjust the curves, curves are one of the most powerful tools in Photoshop but are mostly used for photo retouching, but you can also made some great effects with them too. Below you can find the settings that I use when doing this effect. Below is what the text should look like after you have changed the curves.
Deselect the image. Then invert it (image/adjust/invert)

Rotate the image 90cw.

Apply the wind filter. For short icicles use the wind filter once, for long do it twice. I used it twice in this example.

Straighten up the image by rotating it 90ccw.

Now it is time to give the image some color. Go to image/adjust/Hue Saturation and make sure that the colorize box is checked. Move the sliders around and find a color scheme that looks like ice to you. You may have to play with both the Hue and the Saturation levels for the desired effect.

The last step really brings this effect to life. Choose your air brush tool and use one of the custom brushes that came with photoshop to give it that sparkle look.

Any questions or comments on this Photoshop tutorial please fill out the form below.
Filed Under Tutorials | 6 Questions/Comments |
Comments & Questions
If you would like to make a comment, or ask me a question, please fill out the form below.
If you want a personalized image to appear with your comment you need a Gravatar.
Sign up for a Gravatar today. It's free and easy

October 12, 2009 6:51 AM
Very good tutorial!
March 27, 2010 2:45 AM
I am looking for a tutorial to create a frozen effect on a picture I have of a rose using adobe photoshop cs2. do you have nay suggestions? Thank you.
November 7, 2010 1:58 AM
Thanks for your tutorial. I like it.
August 19, 2013 8:43 PM
Why is it every time i will change the Hue/Saturation of the text it is disabled? i followed your step by step instructions carefully….thn’x 🙂
August 21, 2013 11:40 AM
Francis S. Nacion, with the information that you gave me it’s very difficult to diagnose your problem.
I just did followed the tutorial myself (I hadn’t done it in years as this tutorial is very old) and everything works fine. Are you on the correct image mode? Go to Image/Mode and you should see RGB Color checked. I have a suspicion you may be on Indexed Color mode.
Hope that helps.