CRT Projector Focus & Mechanical Aim Basics
This guide was written by Guy Kuo of Ovation Software, Inc.
Focusing and aiming a CRT projector is a daunting task. It involves two projection systems which operate in series – optical and beam focus. Problems in one system make it difficult to see problems in the other. As a result, first time owners are sometimes at a loss as to which system is the problem. Add to that the need to astigmate the electron beam and adjust lens flapping (Scheimpflug) and the novice CRT setup can fall far short of the projector’s optimum.
Read through this document in its entirety before proceeding. At first, it will seem as though some steps are discussed in jumbled order. I have attempted to present this in sequence but one must perform tasks iteratively to achieve the final result. One revisits earlier steps because later steps make earlier ones easier to do more accurately.
Equipment Recommended:
- An external test pattern DVD such as AVIA or S&V HTT or a test signal generator provide the signals needed for alignment.
- A good pair of binoculars which can focus at SHORT distances is very helpful for critically observing the effect of adjustments.
- One roll of 3M brand blue easy release masking tape for marking the center of screen surface and edges. Do not substitute another brand of tape.
- Tape measure to find center of each screen edge
- Laser Pointer or CLEAN straight edge for finding screen center
Raster, Image Area and Internal Test Pattern Centering on Tube Face
Centering of the image on the tube phosphor surface is done by centering the raster on tube phosphor and then centering of the actual image within the raster. You should begin by hooking up and displaying a video source.
Raster – The area of the tube phosphor that is painted by the electron beam.
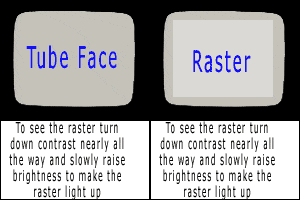 Normally, only part of the raster is actually used to produce the image. The raster can be seen by peering through the lens after turning down contrast nearly all the way and then raising brightness to make the normally black raster light up. This makes the entire raster light up dimly. It may be necessary to open the left, right, top, and bottom blanking controls to allow visualization of the entire raster. Size of the raster is adjusted using vertical and horizontal size (aka amplitude) controls. The rasters are best kept small enough to ensure active video image is never extended beyond or near the phosphor edges. Keeping at least 7 to 10 mm of unused phosphor on all edges helps prevent the catastrophic tube failure that will occur if active image is projected beyond or too close to the phosphor edges. Since the raster is usually larger than the actual image area and it is actually the energy of the image area that can cause damage, some installers will allow the raster to extend beyond the edges while still maintaining image area within the safe portion of the phosphor.
When viewed on screen, the leftmost portion of the raster is drawn first after the electron beam completes horizontal retrace. Looking into the projection lens the orientation is backwards. During the first portion of the horizontal movement the beam has not settled completely and one may see some waviness in the image if the extreme left edge of the raster is used. Some installers will intentionally displace the raster slightly leftward so the active image is displayed on the later, more stable portion of the raster.
Centering the raster is performed by use of centering magnets on the CRT necks just behind the deflection yokes. The centering magnets are a pair of rings with small tab handles. By rotating the rings relative to each other and also around the neck of the tube one can shift the raster about the phosphor surface. Most projectors also have electronic static position controls for fine adjustment of the raster centering. It is best to use minimal electronic correction to reduce strain on the convergence circuitry. One can do so by centering the electronic controls prior to centering the raster with the centering magnets. On some projectors (such as NEC XG’s), there are no centering magnets and raster centering is carried out purely with electronic controls for raster centering hidden in a service menu. Even on such machines it is reasonable to first center the user centering controls prior to setting the service menu raster centering controls.
Image Area – The portion of the raster which is actually used to display the video image
Within the raster, the active video image is displayed. The projector often has “position” or “image shift” controls which allow movement of the image within the raster. The name of this control varies from brand to brand. You can verify you have the correct control by making the raster visible and seeing if the image is moving about within the raster but the raster is not moving as you use the control. If raster moves as well as the picture, you are adjusting the raster position and not the image position within the raster.
Ideally, the image area is centered both vertically and horizontally on the phosphor surface. You can achieve this by first neutralizing the linearity controls and then centering the raster relative to the phosphor edges. Then center the image area within the raster edges. Once both are done, display a white field pattern from a calibration disc (AVIA, S&V Home Theater Tune-Up) and verify that the active is centered in the phosphor. We’ll cover this in greater detail later.
BTW, Don’t use an internal test pattern for checking centering as they are often not themselves centered relative to external signals unless you have also taken the steps described next in this note.
Internal Test Pattern Centering
Built in test pattern generators do not necessarily coincide with actual video signals in timing. They tend to be off center and not exactly scan locked to match a real signal. This means that making an internal test pattern look correct does not necessarily optimize the machine for a real signal. However, internal test patterns are handy and some machines like NEC’s actually require you to set their timing relative to the video signal and convergence systems to prior to other geometry and convergence adjustments. If you have a machine which allows adjustment of internal test pattern timing, it is possible to center the internal test patterns to coincide with the center of actual video signals. This is much easier to do if mechanical gun aim has already been accomplished. In the next section, mechanical gun aim will be covered so skip forward and do that. Then set internal test pattern centering (phase) as described below.
For example, the phase control of NEC projectors MUST be set before geometry and convergence adjustments when creating a new input memory. The phase control changes the timing of the internal test pattern generator and also timing of the convergence system relative to the video signal. Since you have already centered the gun mechanical aim and centered the image on the screen and phosphor surfaces, adjusting phase to make the internal generator centered on screen also centers it with the video image center. Adjust phase to make the center vertical line of the internal generator centered left/right on screen. Then adjust phase to make the deflection blip centered around the center vertical line. The blip shows the centering of the convergence system. If it makes it easier for you, display the internal center cross pattern rather than the crosshatch while adjusting phase. Ignore the odd shape of the lines, just concentrate on the position of the middle of the center vertical line and the blip.
Since there is no control to shift the internal test pattern vertically, the only way to achieve vertical coincidence of the image and internal pattern centers is the image position control. Once that is done, you may need to readjust projector tilt to get things centered on screen. Going through all gains you the option of using either internal or external test patterns with good accuracy.
One should strive to keep the image centered within the phosphor surface and leave at least 7 to 10 mm of unused phosphor all around the active image. Mechanical aim of the guns is easier to do when the image and rasters are vertically and horizontally centered on the tube faces. Further fine tuning of raster and image centering can be performed as well as centering of the internal test pattern generator once gun aim is accomplished.
Mechanical Gun Aim
If your projector has lens tilt rings, set them to factory spec for your projection distance before doing any aiming.
You must first mechanically aim the guns properly. Most CRT projectors have red and blue lens/CRT assemblies (aka gun assembly) capable of swinging left/right. Up/down mechanical aim is accomplished by altering projector tilt. These movements mechanically aim the center of all three guns so they converge at screen center. Typically four bolts accessible at the bottom edge of the gun assembly secure the gun. These are loosened to free the lens and gun assembly and allow left/right swing. Do NOT REMOVE all four screws. Merely loosen them. Check in your installation manual to verify which screws need to be loosened. Some projectors only have a few fixed swing angles which are secured by placing a locking screw through specific drill holes. Others allow infinitely variable convergence angle and are secured by placing the locking screw through an arc shaped slot instead of a hole. The green gun usually isn’t adjustable left/right so getting the projector centered and square to the screen during mounting is vital.
The guns sometimes stick in their prior position even when the screws are loosened. Controlled pressure can free a gun, but never force the guns because a sudden give way motion could snap a tube neck. One method of producing controlled pressure is to place some fingers between the lenses and gradually form a fist. This allows considerable pressure to be exerted without risk of sudden excessive motion. Once freed, just point each gun exactly and lock them in position. How that is accomplished comes next.
Marking Screen Center
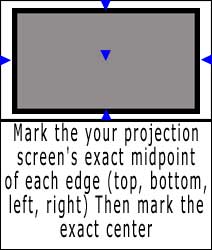
Mark the your projection screen’s exact midpoint of each edge (top, bottom, left, right) with a triangle of 3M blue easy release. Then mark the exact center with a LIGHTLY applied triangle of the same tape. This tape, if left for less a few hours, should not mar a screen. At least it never has in my hands. I cannot say the same for other brands so I suggest no substitutes. Finding screen center can be accurately done using a laser pointer placed at one screen edge midpoint marker and bouncing the beam off the screen surface to make a spot at the opposing midpoint marker. If a laser is not available, a tape measure can suffice so long as care is take to avoid marking the screen with tape measure.
Aiming the Guns
The traditional method of setting mechanical aim is to display a center cross, center the cross in each phosphor and then swing the guns and tilt the projector to place the projected red, green, and blue crosses all at screen center. The problem with the traditional technique is the difficulty in judging when the center cross pattern is accurately centered on the phosphor. I prefer an alternative technique which is easier to visually judge ? centering using edges. Basically, this takes advantage of how easy it is to accurately judge evenness of the gap between test pattern edges and the phosphor edges.
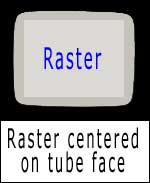 Turn down contrast and display a white field pattern and shift the raster to make the edges of the pattern equidistant relative to the phosphor edges. Look into the lenses while doing this, not at the screen. You will need to do this for each gun. The pattern will be widest at the CRT bottom assuming ceiling mount. Adjust size and position left/right to assure the pattern is well clear of the phosphor edges and equally spaced from the edges at its greatest left and right extents. Adjust the pattern up/down to achieve even spacing for the top and bottom edges as well. Once that is done, the pattern is precisely centered left/right and top/bottom on the phosphor surface. All you need to then is mechanically aim the guns to project that centered pattern so its edges are centered relative to the projection screen.
Look at the top of the projection screen and examine the left/right relationship of the projected pattern edges and the screen edges. Swing the gun left/right to equalize the edge relationships. Don’t worry if the red and blue guns are not yet the same width. Just make sure the edges are balanced left/right for each gun. Lock the CRT’s into position. They are now precisely mechanically aimed left/right.
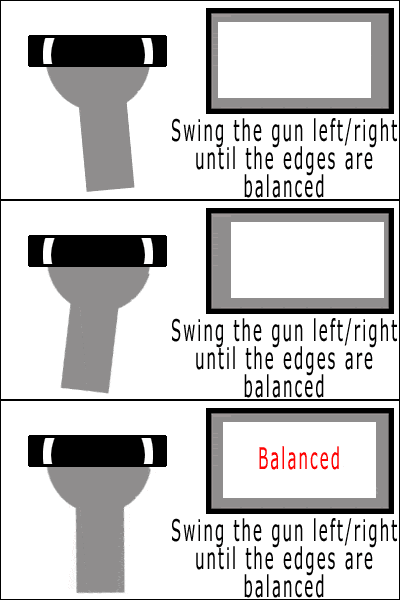
Next, pay attention to how the projected white field pattern is positioned vertically using just the green gun. You should have previously set the pattern so is centered up/down on the phosphor. Adjust projector tilt up/down to make the projected green white field edges equally balanced relative to top and bottom screen edges. Now for more explanation.
If you happen to know your center cross pattern is already precisely centered you can just use the center cross to aim the tubes. Unfortunately, the most accurate way I know of doing that is to pull the lenses off, center the cross on the phosphor while measuring with a ruler, then remounting the lenses. The white field pattern edge comparison method described above allows easy, accurate physical aim and centering on the phosphors without pulling the lenses. This also gives a subtle plus for the red and blue guns as I’ll explain later.
I know this method seems backwards, but balancing the edges of a white field pattern against the edges of the phosphor and then the projected edges relative to the screen edges achieves precise mechanical aim in an easy manner. The advantage to this method is basically the difference between having someone mark the middle of a piece of paper without aid of a ruler vs aligning a slightly smaller piece of paper so it is uniformly spaced inside the larger piece of paper. The latter is easier to do accurately.
Consider the off center red and blue guns. If you aim the actual center of the phosphor of those tubes to project at the center of the screen, you’ll note that the phosphor usage distribution is unequal left/right due to the throw angle. Graph it out and you will see that the farther half of the screen gets illuminated with a smaller area of phosphor. Ever notice how the side of the screen opposite the side of the gun is less well focused? This is part of the reason.
Centering a field pattern relative to the phosphor and then using those lit up edges to guide lens aim will actually place the red and blue guns so they are mechanically slightly off true center. The left lens ends up pointed slightly left of center and the right lens ends up slightly right of center. At first blush, this seems wrong, but this can actually be advantageous because it makes the raster usage, resolution, and illumination more uniform across the screen. Less horizontal linearity compensation and lens flapping are needed.
Now if you are a traditionalist and want the center of the phosphor actually aimed at the center of the screen, you can pull the lenses off, set the center cross with great precision and then use the projected center cross position to guide mechanical aim. This is the usual way things are done, but I present an alternative approach with some advantages.
You have now precisely aimed the gun assemblies. From now on, anything projected that appears centered on the screen is also appropriately centered on the phosphor.
Note: Mechanical Aim is Not Scheimpflug (Lens Flapping)
Novices confuse the two, but mechanical aim is not the same as lens flapping (aka Scheimpflug). Mechanical aim of the CRT/lens assembly is akin to taking a telescope and physically pointing it at something. Lens flapping adjusts the mounting angle of the end lens without changing the direction the telescope is pointed. Lens flapping doesn’t change the direction of aim (well just a little), but compensates for the planes of the screen and phosphor being non-parallel. If the lens were kept parallel to the phosphor surface, it would be impossible to focus throughout the screen at the same time. The flapping places the lens into a plane intermediate between those of the screen and phosphor and that makes global focus possible.
Rough Optical Focus
Now that mechanical aim of the guns has been done, it is time to do an initial, rough optical focus.
Display a crosshatch pattern. Adjust optical focus using the two knobs. The front most knob on the lens controls edge optical focus. The rear most knob adjusts center optical focus. Dial in center focus first. Then adjust the outer (front knob) focus to while watching the corner lines of the crosshatch flare inward and outward. Try to minimize flaring using the outer focus knob. Go back and forth between the two optical focus knobs to get both center in focus and outer edge minimally flared. Use of binoculars aids this process tremendously.
Rough Scheimpflug (Lens Flapping)
Once rough optical focus is completed, you can perform lens flapping. The following is primarily for projectors which have continuously variable lens flapping. For projectors with lens flapping rings, simply set the lens rings per the installation manual specified settings for your projection distance.
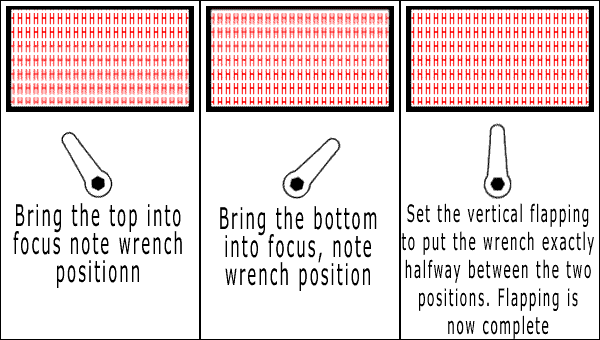
Display a focus pattern. Look ONLY at the center of the top edge. Adjust center optical focus to make that edge sharpest. Note the position of the focus knob. Pay attention to the center of the bottom edge. Adjust lens center focus to make the bottom edge sharpest. Is the lens center focus control in the same position as when the top was sharpest? If so, vertical flapping is correct. If not, adjust vertical flapping using a wrench. Note the wrench position when the bottom edge is focused vs top edge. Set the vertical flapping to put the wrench in exactly halfway between the two positions. Horizontal flapping is performed in an analogous fashion paying attention to only the left and right edges.
Now go back and refine center and edge lens focus. Once that is done you should have the lenses in fair optical focus and flapping. Advanced owners may consider the 3 x 5 card technique fine focusing technique presented later in this document for even better optical focus and Scheimpflug.
Phosphor Grain Optical Focus Technique for when the Electron Beam Has not been Focused Yet
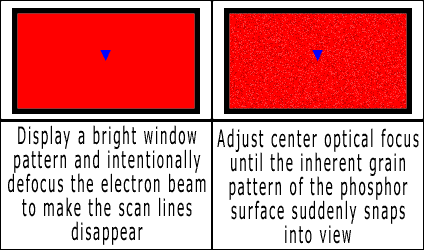
Most people have difficulty deciding whether optical, beam or both kinds of focus problems are present, particularly if they have not already achieved good beam focus. Here is a trick for setting good optical focus without being confused by beam focus. You must have a good pair of binoculars which focus at a short distance to use this technique.
The phosphor surface of a CRT has an inherent grain pattern. Because this grain is visible and is exactly at the plane of light generation, one can use the grain to set optical focus independent of beam focus. A small piece of 3M easy release blue masking tape aids in keeping your eyes correctly focused on screen. Display a bright window pattern and intentionally defocus the electron beam to make the scan lines disappear. Adjust center optical focus while viewing the screen through binoculars. When optical focus is correct, the inherent grain pattern of the phosphor surface suddenly snaps into view. This is nearly impossible to see with naked eye, but binoculars make it readily evident.
Electron Beam Focus
The electron beam focus system in a projector can be a simple one such as in an electrostatic system or a complex dynamically varied magnetic focus system. Sharp electron beam focus is easier if optical focus has already been done. Be sure to perform an adequate first optical focus prior to fine tuning beam focus.
You have also seen the word “astigmation” mentioned in regard to beam focus. Astigmation further shapes the electron focusing lens beyond regular focus controls and is important for achieving maximal beam focus. However, it should be fairly well set at the factory and new comers to CRT setup are best advised to avoid attempting CPC magnet astigmation adjustments until they are more familiar with projection CRT setup. For this reason I will cover astigmation last in this document even though it should actually be performed PRIOR to electron beam focusing adjustments.
Focusing Lens Cap to Assist with Electron Beam focusing
The phosphor grain optical focusing technique largely eliminates the need for this trick, but I mention this for completeness. Some projectors come with a special lens cap having a central hole approx 1 inch in diameter. This is intended to reduce the aperture of the optical lens and allow examination of beam focus even when optical focus is not quite correct. Because the phosphor technique easily achieves good optical focus independent of beam focus, I recommend setting the optical focus using the phosphor grain technique rather than resorting to a focusing lens cap.
Electrostatic Beam Focus
Electrostatically focused CRT projectors have their electron beam focus adjusted using variable resistors aka pots. These adjust the charge on the focus lens for each gun. Focus controls are often housed together and marked as focus for each color gun. On that same housing may also be “screen” controls which adjust G2 voltage. It is easy to inadvertently adjust the screen controls while attempting to adjust beam focus. I recommend that the novice cover screen controls with a taped on piece of cardboard to avoid accidental adjustment while attempting beam focus.
Check Beam Astigmation
Display a dot pattern on the projector. Work with only one gun on at a time and set contrast to moderately high level. Binoculars are once more useful in observing the effects of your adjustments. As you vary the focus pot setting, notice how the dots change between the overfocused and underfocused directions of focus adjustment.

The overfocused state changes the dots into a central bright core with a halo around it. Ideally the bright central core is exactly centered in the halo. Also the dots should move very little as focus is adjusted between over and underfocused states.
The underfocused state changes the dots into a uniformly lit blob. Ideally the blob is perfectly circular in shape at screen center. It is normal for some deformation to be present at screen periphery.

If you find the bright core off center, the blob isn’t circular at screen center, or the dots move as you adjust focus, astigmation for that gun needs to be corrected. That is done using the CPC astigmation magnets on the neck of each gun. CPC magnet adjustments should only be handled by a technician or very advanced user. Great caution is required due to risk of electrical shock, death, and equipment damage. Novices should enlist the aid of a technician if astigmation problems are noted on an electrostatically focused machine. On electromagnetically focused machines, there are often safe user accessible astigmation controls, suitable for the non-technician.
Once correct astigmation is verified (or you have decided to live temporarily with poor astigmation), proceed with the actual focusing of the guns. On an electrostatic machine it is simple.
- Display a fine detail focus pattern or a dot hatch pattern . Set contrast to a medium level.
- View only one gun at a time and adjust that gun’s focus pot for best overall focus. It is often impossible to achieve perfect beam focus throughout the entire screen. The screen edges are particularly problematic. Should that be the case, weigh the screen center as most important for your compromise setting. That is where most film material will be sharply focused.
The blue gun electorn beam is usually left slightly underfocused to allow better grayscale tracking at higher light output levels. If you have light metering capability, that means underfocusing the blue gun enough to increase blue light output by about 20% over the fully focused state. Note that this does not mean the blue gun OPTICAL focus should be left blurred. Just the electron beam focus! They are not the same.
Electromagnetically Focused Projectors
EM focused projectors populate the pinnacle of projection CRT technology. These machines use a magnetic coil to focus their electron beams. This is often combined with a system for dynamically varying focus to achieve good center and edge focus. (This is also done on some electrostatic machines, but not with adjustability) The EM focused projector also usually has some form of dynamic astigmation controls to refine beam spot shape throughout the screen. These extra dynamic focus and astigmation controls allow very fine focus compared to electrostatic units, but more controls means greater effort to achieve final results. EM focus also induces some spiral geometry distortions which need to be counteracted. The novice can do it successfully, but more work is needed to get everything in order.
Fore and aft sliding of the focus coil and rotation of the dynamic astigmation coils are not covered in this document. Those are maneuvers safest left to experience hands.
EM focused projector typically include a remote operable control control for overall (aka center) beam focus. This is analogous to the focus pot in an electrostatic focused machine. An EM focused machine also usually provides additional controls for fine tuning beam focus at the image edges, corners or screen zones. These extra controls allow better edge to edge beam focus than just a fixed single focus control setting.
The EM focused machine also adds a mechanism for dynamically correcting beam astigmation for each portion of the image. Dynamic astigmation refines overall beam focus beyond that achievable with just static CPC magnet astigmation. Again a control is supplied for adjusting overall astigmation (center of screen usually) and other controls for each edge, corner or zone of the screen.
Check Static Beam Astigmation
The machine will usually have some sort of CPC magnet assembly for rough static adjustment of beam astigmation. If the CPC magnets are properly set, the dynamic astigmation system won’t have to work as hard to achieve good astigmation. For this reason, it is a good idea to verify and adjust the CPC magnets are properly set by neutralizing all the dynamic adjustments and then checking static beam astigmation. If the underlying static astigmation is flawed, the CPC magnets should be corrected prior to performing dynamic astigmation. The complete set of CPC magnets may not be present in a EM focused machine. Consult your service manual. Once static astigmation is done as well as possible with the CPC magnets, fine tune with the dynamic astigmation system.
Set all dynamic astigmation controls to neutral to eliminate the effects of the dynamic astigmation system.
Display a dot pattern on the projector. Work with only one gun on at a time and set contrast to moderately high level. Binoculars are once more useful in observing the effects of your adjustments.

As you vary the center EM focus setting, notice how the dots change between the overfocused and underfocused directions of focus adjustment.
The overfocused state changes the dots into a central bright core with a halo around it. Ideally the bright central core is exactly centered in the halo. Also the dots should move very little as focus is adjusted between over and underfocused states.
The underfocused state changes the dots into a uniformly lit blob. Ideally the blob is perfectly circular in shape at screen center. It is normal for some deformation to be present at screen periphery.
If you find the bright core off center, the blob isn’t circular at screen center, or the dots move as you adjust center beam focus, astigmation for that gun needs to be corrected. That is done using the CPC astigmation magnets on the neck of each gun. CPC magnet adjustments should only be handled by a technician or very advanced user. Great caution is required due to risk of electrical shock, death, and equipment damage. Novices should enlist the aid of a technician if astigmation problems are noted on an electrostatically focused machine.
Dynamic Astigmation
Once static astigmation has been adjusted with the CPC magnets, one can proceed with dynamic astigmation. Some projectors will automatically underfocus and overfocus the electron beam appropriately when astimation controls are engaged. If yours does not do so, manually set beam focus to be underfocused or overfocused as needed. See the later section on CPC Astigmation for details of over vs underfocused beams with regard to astigmation.
Display a dot pattern and set contrast moderately high.
Start with all astigmation controls neutralized (center, all edges, corners, or all zones).
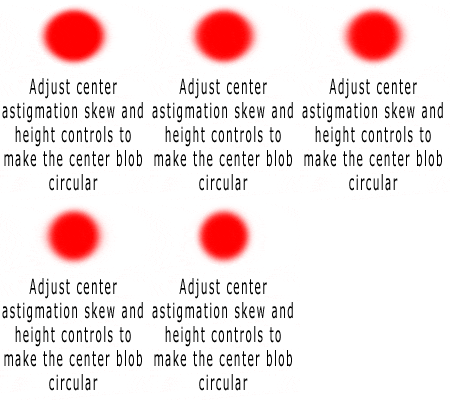
Adjust center astigmation skew and height controls to make the center blob circular. The machine may also have dynamic equivalents of the 2 pole adjustment. Adjust that to make the central spot centered in its halo. The actually set of dynamic astigmation controls vary from model to model, but the sequence is to perfect the center astigmation first. Then do the edges and finally corners of the screen. Zones interact so go back and fine tune when done the first time.
EM Beam Focus
Once astigmation is completed, electron beam focus can be done while viewing a fine crosshatch or focus pattern. Again, start by neutralizing focus controls for center, edges, corners or all zones. Focus the center of the screen first. Then do each edge and finally the corners. This particular order allows the interaction of the edge controls to do some of the corner correction before using any corner adjustments. Once more, recheck overall beam focus and retouch as needed.
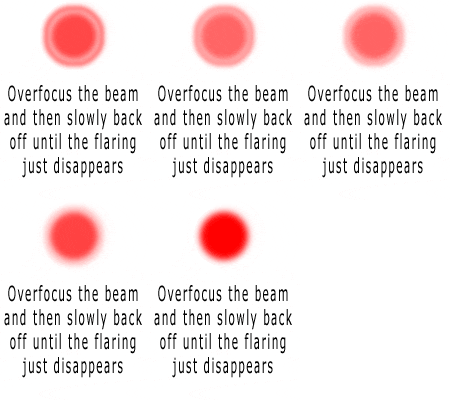
The goal of adjusting beam focus is not only to minimize electron spot size but also reduce the flare around the spot as much as possible. Any flaring will cause edge transitions to appear soft. You will create an overall sharper looking image by accepting a slightly larger spot size if doing so eliminates the flare. Overfocus the beam and then slowly back off the control to allow the flare to diminish. Leave the control at the point at which flaring just disappears. You may need to perform this adjustment with contrast turned up enough to show the flaring. This optimizes the projector for best sharpness but not necessarily best resolution. The dot size may end up slightly larger and reduce resolution, but the increased sharpness will usually make the overall image look better defined.
This concludes beam focusing for EM projectors. I have condensed the process. The reader will best find the particular controls for his machine in the service and setup manual for the machine.
3 X 5 CARD OPTICAL FOCUS TECHNIQUE
At this point in the process, both beam and optical focus should be excellent, but further refinement is sometimes possible.
Use a plain white 3 x 5 card for finding the exact focal distance of the projector. Do this by moving the card fore and aft in front of your screen to see at where a fine focus pattern is best in focus. If it is already exactly at the screen surface plane throughout the screen, then you are done. If it is more than 1 cm in front of or behind the screen do the following. And yes, this will temporarily undo the hard work done getting the phoshor grain sharp.
Display a fine detail focus pattern (internal focus pattern or S&V Home Theater Tune-Up) and intentionally overfocus the optics (rear lens control) so that the center is best optically focused about 2 cm short of the screen. This is in the direction that extends the lens barrel forward. Bringing the focal plane slightly short of the screen lets you more easily examine the focal distances throughout the image area. Check the focal distance for each screen edge by moving the 3 x 5 card back and forth in front of the screen. You’ll be able to see very accurately the distance at which things are best focused on the 3 x 5 card. Check if the distances are uneven between left/right (indicating a horizontal lens flapping error) and top/bottom (indicating a vertical lens flapping problem). Fine tune lens flapping to make the focal distances for top = bottom, and left = right. This is the time to fine tune lens flapping rings. The 3 x 5 card check is so precise that you’ll notice the flapping changes caused by uneven tension on the lens mounting screws.
Next, pay attention to how the left and right edge distances compare to the distance at screen center. They should be about equal between center and edges. If not, slightly adjust the inner and outer optical focus to bring both the edges and center to focus about 2 cm in front of the screen. Notice that I don’t have you check the screen corners. That is because there will almost always be a difference in the extreme corners and center and using the left/right edges gives a good compromise which preserves the central focus where the video image is going to be sharpest portion of a movie frame anyway.
At this point the optics are perfectly balanced in terms of Scheimpflug and inner vs outer lens focus. The next step is to shift the entire optical plane back onto the screen surface. Make tiny movements of the rear lens focus knob while repeatedly checking the optical focus position with the 3 x 5 card. One thing to consider is that you probably did all this with the projectors lens hood off and the lenses are a little cooler than normal. As the lenses warm up, their index of refraction decreases, the lens mounts expand, and the focal plane can move slightly inward or outward. You should recheck the focal plane when the optics reach normal operating temperature an hour or so after the lens hood and hushbox are closed. Also, recheck 24 hours later and compensate for mechanical settling.
If you use the 3 x 5 card for final optical focus, you’ll note that it is so sensitive an indicator that even the slight shift of the lens while tightening the focus knobs will be detectable. Focusing a projector is an iterative process in which improvement in either optical or beam focus enable finer observation and adjustment of the other focus system. Patient and diligent technique is needed to achieve maximal sharpness of both optical and beam focus systems. Expect a great deal of exercise moving between screen and projector using this technique.
Perfected optical focus means that even better beam focus may be possible. Revisit beam focus and fine tune as appropriate.
Only AFTER both optical and beam focus are perfected should you do final work on geometry and convergence can proceed. Otherwise, geometry and convergences changes wrought by focus adjustments will upset a hard gained geometry and convergence setup.
Speaking of which, the next steps in projector setup would be
- Rough geometry and convergence
- Grayscale calibration (with possible blue gun defocusing)
- Final geometry and convergence
— Advanced Setup Technicians Only —
CPC Magnet Adjustment of Beam Astigmation
Warning!!!!! Novices and non-technicians are warned to avoid performing astigmation CPC magnet adjustments. Adjustment of CPC magnets should ONLY done by advanced setup personnel. Improper technique will render focus impossible. High voltage shock and tube neck fragility are also significant hazards during CPC magnet adjustment!!!!
Electron beam focusing lenses are not perfectly uniform. Also, the direction of the earth’s magnetic field can cause the beam to enter the lens off center. Astigmation of the beam fine tunes the lens uniformity and centers the beam as it enters the lens. This allows the beam lens to create a small electron spot with minimal flaring. Poor astigmation can make good electron beam focus impossible.
Static electron beam astigmation is carried out using CPC magnets (called Color Purity Control for historical reasons) on the tube neck and/or electronic astigmation controls. If both CPC magnets and electronic “dynamic” astigmation controls are present, it is best to let the CPC magnets do most of the work and have the electronic astigmation system merely fine tune the effects. One must neutralize the electronic astigmation controls prior to adjusting CPC magnets.
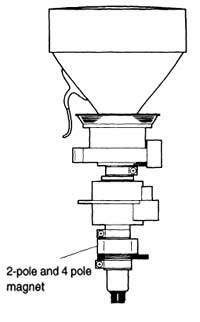
CPC magnets are arranged as pairs of rings about the end of tube neck near the socketed drive board. They should not be confused by the much more forward raster centering magnets just behind the deflection yoke. Projectors don’t always have the full set of 2, 4, and 6 pole CPC magnets. CPC magnet assemblies vary in appearance and mechanical design. Sometimes the ring pairs have a small knob allowing one to adjust the angle between the two rings of a pair. More often one merely sees tabs with which to manipulate the rings. The CPC have 2, 4, or 6 magnetic poles, but don’t confuse that with the number tabs on the rings. One cannot actually see the poles. By varying the angle between the two rings of a pair (moving tabs in opposite directions or twisting a little knob) one varies the intensity of the effect. Rotating a pair about the axis of the tube neck (moving tabs in same direction or twisting little knob in opposite direction) changes the directionality of the effect. If all three sets of CPC magnets are present, the rearmost is the 2 pole (centering). The middle is the 4 pole (ovalness). And the most anterior (if present) is either non-functional or a 6 pole correction (triangularity).
I’ll reiterate since this seems to confuse some people….
Intensity: The amount of effect that a magnet ring pair creates. For instance if you consider the two pole magnet pair, you can make the rings cancel each other out or augment each other by varying the rotation of the two rings relative to each other.
Directionality: The orientation of the net magnetic effect. If you spin a ring pair TOGETHER around the tube neck you spin the direction in which the poles affect the electron beam. Notice that this minimally changes how the poles cancel or reinforce each other. Spinning the pair together merely lets you vary the direction in which that magnet ring pair squeezes or expandes the beam.
Spinning a pair together changes the direction of the effect, but making the two rings of a pair spin in opposite directions changes the amount of their effect.
Because the factory performs CPC magnet alignment, shipping can shift controls, and end users are not expected to make these adjustments, the CPC magnets are usually held in place with some silicone adhesive. This must be removed carefully. Very cautious picking at the adhesive with fingers will usually free the controls. Do not mechanically stress the tube necks!
Again, neutralize all electronic astigmation controls prior to working with CPC magnets. On projectors which lack separate electronic astigmation controls, perform CPC and electronic astigmation while the highest scan frequency to be used is displayed.
I assume you know how to change the electron beam focus and don’t get that confused with optical focusing.
The 4 Pole (middle) CPC magnets affects ovalness of the electron beam lens. Adjust this while displaying a dot pattern with contrast set moderately high. Intentionally UNDER focus the electron beam making the dots into uniform blobs. Adjust the 4 pole magnets to make the center blob as perfectly circular as possible. Physically walk up to the screen to judge shape. Turning the small knob or moving adjustment tabs in opposite directions alters the amount of ovalness. Spinning the 4 pole rings around the axis of the tube neck changes the direction of the ovalness axis.
The 2 Pole (rear) CPC magnets centers the electron beam in the electron beam lens. Adjust this while displaying a dot pattern while contrast is moderately high. Intentionally OVER focus the electron beam making the dots into a flare with a bright central core. Turning the small knob or moving adjustment tabs in opposite directions alters the amount of deflection. Spinning the 2 pole rings around the axis of the tube neck changes the direction of deflection. Make the bright core centered in the flare.
The 6 Pole adjustment is also done with the dots pattern in under focus. If the 6 pole works (it may not do anything) it creates a triangular astigmation change. Use it to correct any residual triangularity which you could not correct using the 4 pole.
Go back and forth between the 2 and 4 pole adjustments to get things right. As a final check, carefully watch the dots as you go from under to over focused. The dots should stay almost motionless as you vary the beam focus. If they move, redo the 2 pole adjustment.
Once CPC magnets are set, fine tune using electronic astigmation if available.
You will have to redo raster centering after adjusting the CPC magnets. If working on the blue gun, you’ll probably want to leave the electron gun underfocused enough to make its light output measure about 20% higher than its fully focused state to improve grayscale tracking at higher light output.
Since very few companies sell CRT projectors any more and brand new ones are ridiculously expensive you are best off buying one used. One of the best places to look for used CRT projectors as well as parts for your CRT projector is on Ebay. Check out these great deals on CRT projectors at Ebay.
Filed Under Guides | 1 Question/Comment |
Comments & Questions
If you would like to make a comment, or ask me a question, please fill out the form below.
If you want a personalized image to appear with your comment you need a Gravatar.
Sign up for a Gravatar today. It's free and easy

April 26, 2015 3:08 pm
Hello Moe,
I just acquired a Sony G70 projector with 6,700 hours on the tubes, but the tubes face are very clean, no burnt marks. only the blue tube which I have to shine the flash light really close to notice. I thought maybe the tubes are replaced at some point but did not reset the hours. My question is all three rasters
are shifted far to the left facing the PJ. Do I centre these mechanically or use the master remote. I read
Curts Palmes website, that there is really nothing to touch inside the PJ. everything is done Via remote.
I wonder if this is one of them. moving the yoke for raster centring.
thanks in advance
Art